---
title: "Rim Taper (HT): Tape application instructions."
description: Instruction video on how to mount nylon and tubeless tape into the HT taping machine.
---
[Skip to content](https://knowledgebase.hollandmechanics.com/knowledge/ht-rim-taper-tape-application-instruction#main-content)
English
Show submenu for translations
[Contact us](https://knowledgebase.hollandmechanics.com/knowledge/kb-tickets/new?hsLang=en) [Customer portal](https://customerportal.hollandmechanics.com/tickets-view?hsLang=en)
![HMLogo RGB high res.png\]](https://knowledgebase.hollandmechanics.com/hs-fs/hubfs/HMLogo%20RGB%20high%20res.png?height=48&name=HMLogo%20RGB%20high%20res.png)
Open main navigation
Close main navigation
- English
Show submenu for translations
- [Contact us](https://knowledgebase.hollandmechanics.com/knowledge/kb-tickets/new)
- [Customer portal](https://customerportal.hollandmechanics.com/tickets-view)
- Go to hollandmechanics.com
Go to hollandmechanics.com
Seek Machine Wisdom Here
- There are no suggestions because the search field is empty.
1. [Help Center](https://knowledgebase.hollandmechanics.com/knowledge?hsLang=en)
2. [General Taping/Stabilizing](https://knowledgebase.hollandmechanics.com/knowledge/general-taping-stabilizing?hsLang=en)
3. [Adjustments](https://knowledgebase.hollandmechanics.com/knowledge/general-taping-stabilizing?hsLang=en#adjustments)
# Rim Taper (HT): Tape application instructions.
## Instruction video on how to mount nylon and tubeless tape into the HT taping machine.
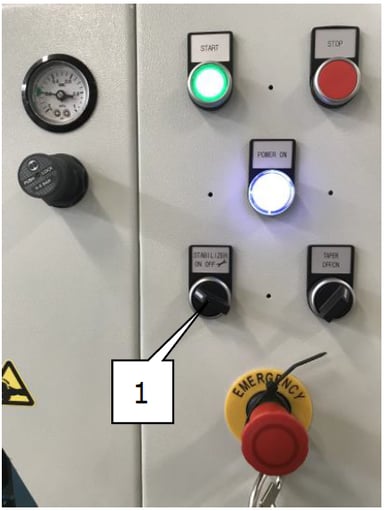
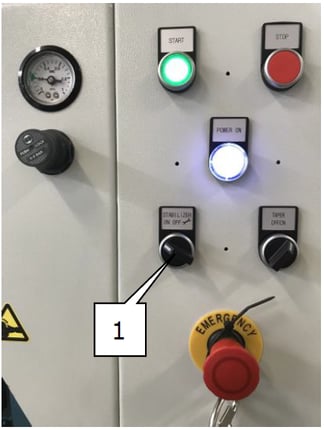
Turn the machine ON and set it to maintenance mode using switch (1). This will stop the machine from loading a new wheel.
• Press the green \ button.
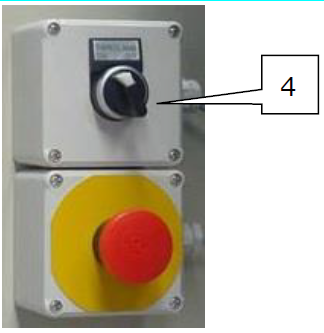
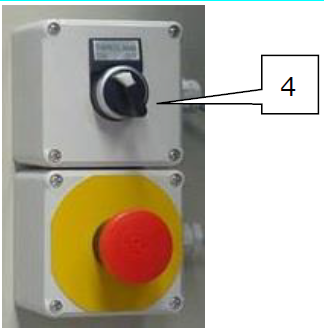
Use switch (4) to open the tape clamp. The blue light will start blinking.
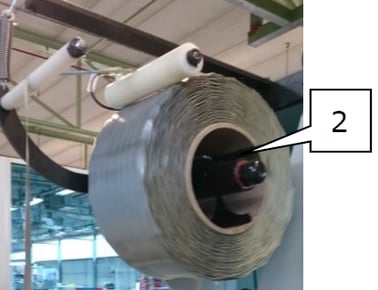
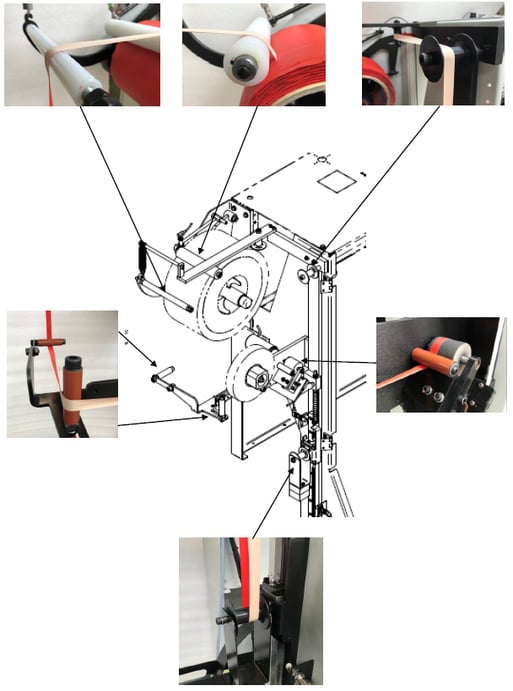
Take out the leftover tape roll from holder (2) and put in a new one.
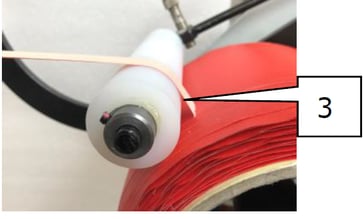
Guide the back of the tape (the non-adhesive side) around the first tape guide roll (3) without twisting it.
Next, guide the tape (backside) around the following tape guide rollers, twisting the tape halfway each time
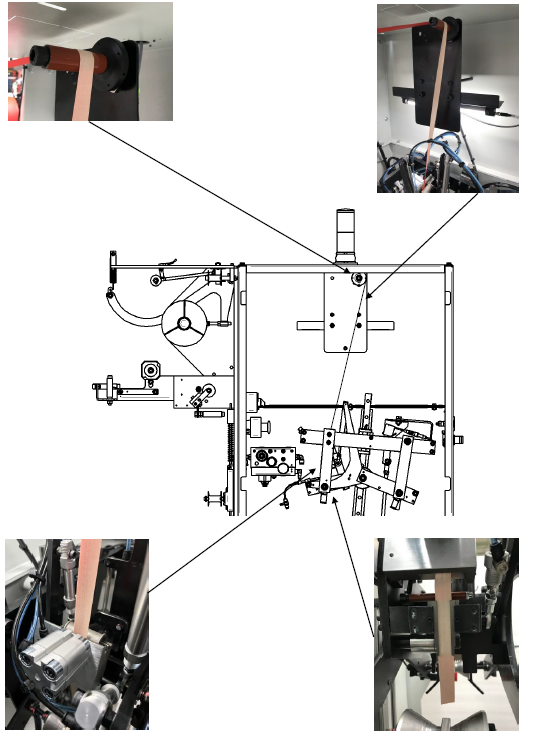
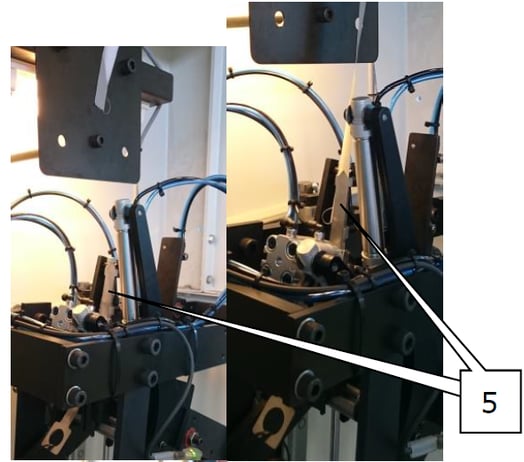
Attach the tape end to the guide tool (5) and feed it through the tape clamp (6), with the sticky side facing the plastic part, and through the tape guide plate (7).
• Pull out about 15 cm of tape.
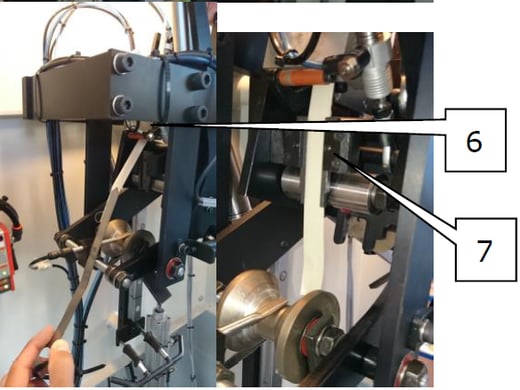
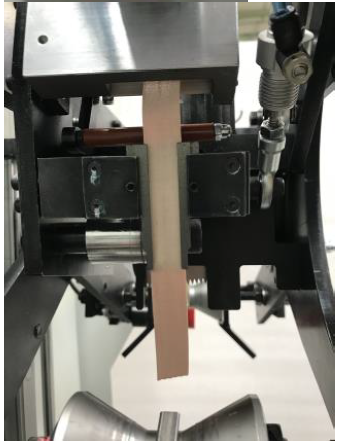
Close the tape clamp using switch (4). **Carefully pull the remaining tape against the knife and cut it to the right length.**
****
Turn OFF maintenance mode and press \. The machine is now ready to use.
- [General Lacing](https://knowledgebase.hollandmechanics.com/knowledge/general-lacing?hsLang=en#main-content)
- [setup](https://knowledgebase.hollandmechanics.com/knowledge/general-lacing?hsLang=en#setup)
- [Troubleshooting](https://knowledgebase.hollandmechanics.com/knowledge/general-lacing?hsLang=en#troubleshooting)
- [Adjustments](https://knowledgebase.hollandmechanics.com/knowledge/general-lacing?hsLang=en#adjustments)
- [General Stabilizing/Stressing](https://knowledgebase.hollandmechanics.com/knowledge/general-stabilizing-stressing?hsLang=en#main-content)
- [Adjustments](https://knowledgebase.hollandmechanics.com/knowledge/general-stabilizing-stressing?hsLang=en#adjustments)
- [General Trueing](https://knowledgebase.hollandmechanics.com/knowledge/general-trueing?hsLang=en#main-content)
- [Troubleshooting](https://knowledgebase.hollandmechanics.com/knowledge/general-trueing?hsLang=en#troubleshooting)
- [Adjustments](https://knowledgebase.hollandmechanics.com/knowledge/general-trueing?hsLang=en#adjustments)
- [Hub Filling Stations](https://knowledgebase.hollandmechanics.com/knowledge/hub-filling-stations?hsLang=en#main-content)
- [Hub Setup](https://knowledgebase.hollandmechanics.com/knowledge/hub-filling-stations?hsLang=en#hub-setup)
- [Troubleshooting](https://knowledgebase.hollandmechanics.com/knowledge/hub-filling-stations?hsLang=en#troubleshooting)
- [Lacing CE-A](https://knowledgebase.hollandmechanics.com/knowledge/lacing-ce-a?hsLang=en#main-content)
- [Maintenance](https://knowledgebase.hollandmechanics.com/knowledge/lacing-ce-a?hsLang=en#maintenance)
- [Lacing CD-A](https://knowledgebase.hollandmechanics.com/knowledge/lacing-cd-a?hsLang=en#main-content)
- [Maintenance](https://knowledgebase.hollandmechanics.com/knowledge/lacing-cd-a?hsLang=en#maintenance)
- [HT - Taping Machine](https://knowledgebase.hollandmechanics.com/knowledge/ht-taping-machine?hsLang=en#main-content)
- [Troubleshooting](https://knowledgebase.hollandmechanics.com/knowledge/ht-taping-machine?hsLang=en#troubleshooting)
- [Robot DC / DD](https://knowledgebase.hollandmechanics.com/knowledge/robot-dc-dd?hsLang=en#main-content)
- [Wheel Setup](https://knowledgebase.hollandmechanics.com/knowledge/robot-dc-dd?hsLang=en#wheel-setup)
- [Robot DT](https://knowledgebase.hollandmechanics.com/knowledge/robot-dt?hsLang=en#main-content)
- [Maintenance](https://knowledgebase.hollandmechanics.com/knowledge/robot-dt?hsLang=en#maintenance)
- [FE - Tire Mounting Machine](https://knowledgebase.hollandmechanics.com/knowledge/fe-tire-mounting-machine?hsLang=en#main-content)
- [Troubleshooting](https://knowledgebase.hollandmechanics.com/knowledge/fe-tire-mounting-machine?hsLang=en#troubleshooting)
- [Calibration](https://knowledgebase.hollandmechanics.com/knowledge/calibration?hsLang=en#main-content)
- [Touch PC](https://knowledgebase.hollandmechanics.com/knowledge/calibration?hsLang=en#touch-pc)
- [Maintenance](https://knowledgebase.hollandmechanics.com/knowledge/maintenance?hsLang=en)
- [Moon Driver](https://knowledgebase.hollandmechanics.com/knowledge/moon-driver?hsLang=en#main-content)
- [Troubleshooting](https://knowledgebase.hollandmechanics.com/knowledge/moon-driver?hsLang=en#troubleshooting)
- [Troubleshooting](https://knowledgebase.hollandmechanics.com/knowledge/troubleshooting?hsLang=en)
- [Lacing Machines](https://knowledgebase.hollandmechanics.com/knowledge/lacing-machines?hsLang=en#main-content)
- [General Lacing](https://knowledgebase.hollandmechanics.com/knowledge/lacing-machines?hsLang=en#general-lacing)
- [CE-A Lacing Machine](https://knowledgebase.hollandmechanics.com/knowledge/lacing-machines?hsLang=en#ce-a-lacing-machine)
- [General Tire Mounting](https://knowledgebase.hollandmechanics.com/knowledge/general-tire-mounting?hsLang=en#main-content)
- [Troubleshooting](https://knowledgebase.hollandmechanics.com/knowledge/general-tire-mounting?hsLang=en#troubleshooting)
- [Wheel Building](https://knowledgebase.hollandmechanics.com/knowledge/wheel-building?hsLang=en#main-content)
- [Hub Filling](https://knowledgebase.hollandmechanics.com/knowledge/wheel-building?hsLang=en#hub-filling)
- [General Taping/Stabilizing](https://knowledgebase.hollandmechanics.com/knowledge/general-taping-stabilizing?hsLang=en#main-content)
- [Adjustments](https://knowledgebase.hollandmechanics.com/knowledge/general-taping-stabilizing?hsLang=en#adjustments)
- [Troubleshooting](https://knowledgebase.hollandmechanics.com/knowledge/general-taping-stabilizing?hsLang=en#troubleshooting)
- [Set Up](https://knowledgebase.hollandmechanics.com/knowledge/set-up?hsLang=en)
- [General Hub Filling](https://knowledgebase.hollandmechanics.com/knowledge/general-hub-filling?hsLang=en#main-content)
- [Adjustments](https://knowledgebase.hollandmechanics.com/knowledge/general-hub-filling?hsLang=en#adjustments)
- [Floorline MJ-A](https://knowledgebase.hollandmechanics.com/knowledge/floorline-mj-a?hsLang=en#main-content)
- [Troubleshooting](https://knowledgebase.hollandmechanics.com/knowledge/floorline-mj-a?hsLang=en#troubleshooting)
[](https://knowledgebase.hollandmechanics.com/knowledge?hsLang=en)
hollandmechanics.com Help Center
Copyright © 2026, Holland Mechanics